Drawing Techniques
Common Coloured Pencil Mistakes and How to Fix Them
Fifteen common coloured pencil (colored pencil) mistakes and fixes: pressing too hard, wrong paper, dull points, muddy colour, overusing black and burnishing too early.
Key takeaways
- ◆Most coloured pencil problems trace back to a few habits: pressing too hard too soon, skipping a plan and ignoring value.
- ◆Fix pressure first: start light, build thin layers and save heavy pressure for the end.
- ◆Match paper, pencils and subject: heavyweight paper with suitable tooth and sharp points make layering far easier.
- ◆Build colours from several pencils rather than black, and use a few sharp highlights instead of many.
- ◆Swatch before you commit, and burnish only when the layers are complete.
Every coloured pencil artist makes the same handful of mistakes, usually in the first year and sometimes for much longer. The good news is that most are habits rather than skill gaps, and each has a clear fix. Knowing them in advance saves paper, time and a lot of frustration.
Here are fifteen common mistakes, what they look like and what to do instead. Coloured pencils are called colored pencils in the US, and every problem below applies under either name. For a structured path through the basics, see coloured pencil drawing for beginners and the wider techniques guide.
1. Pressing too hard too soon
What happens: colour looks strong at first, then the paper stops taking pencil and the surface looks waxy.
Why: heavy pressure flattens the tooth, the tiny hills and valleys that catch pigment, so later layers cannot grip.
Fix: start with light pressure and build gradually. Think of each layer as a whisper. The full method is in how to layer coloured pencils.
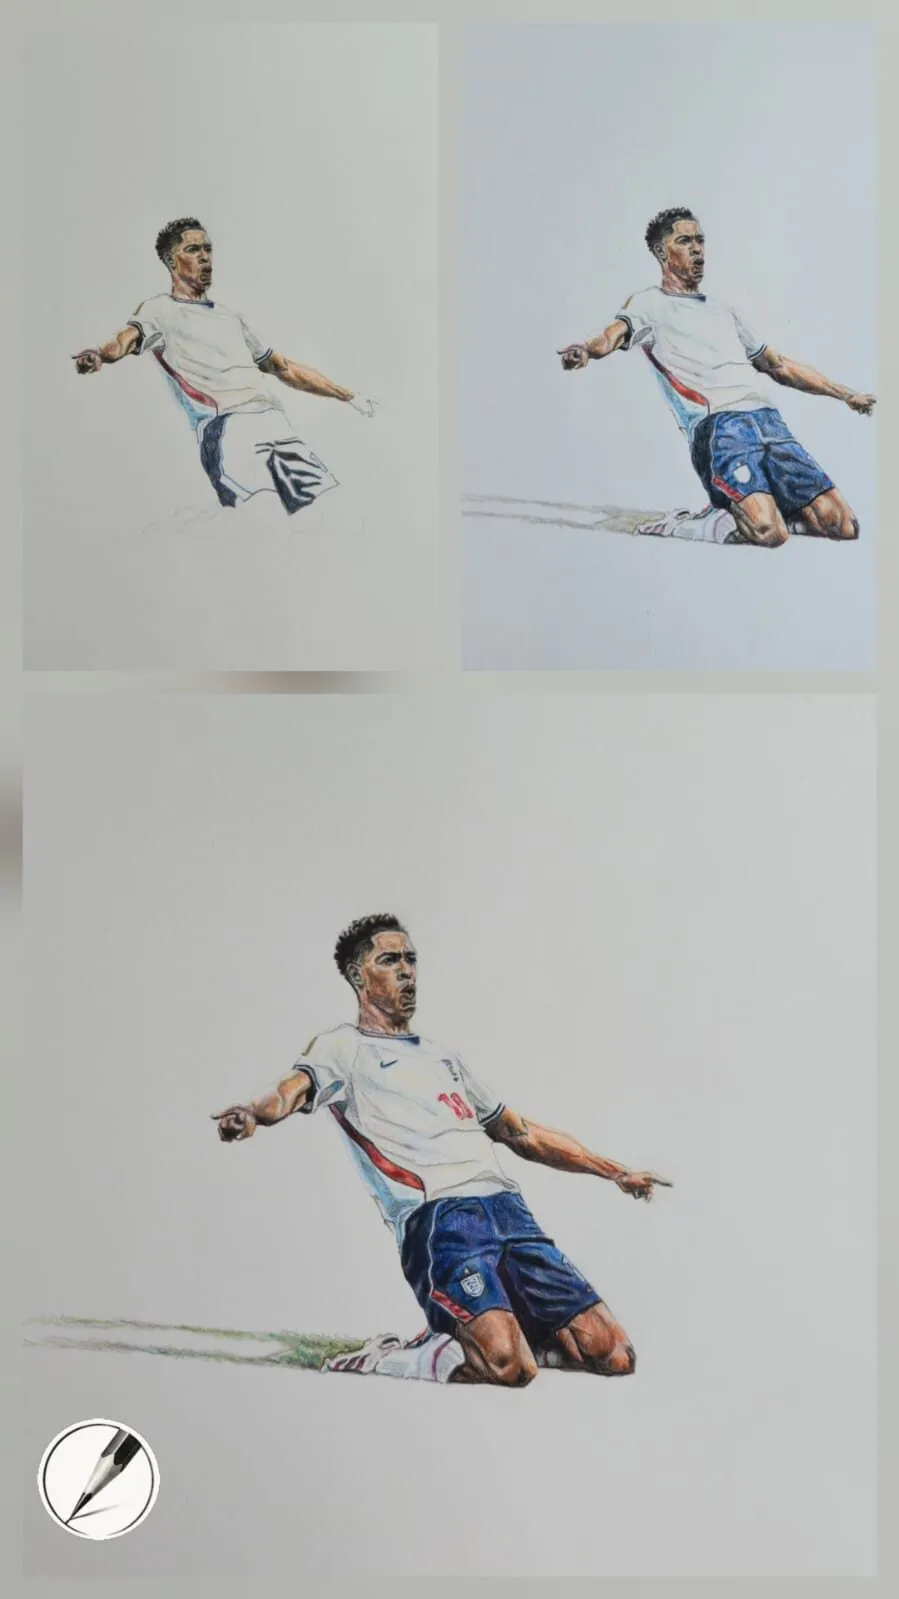
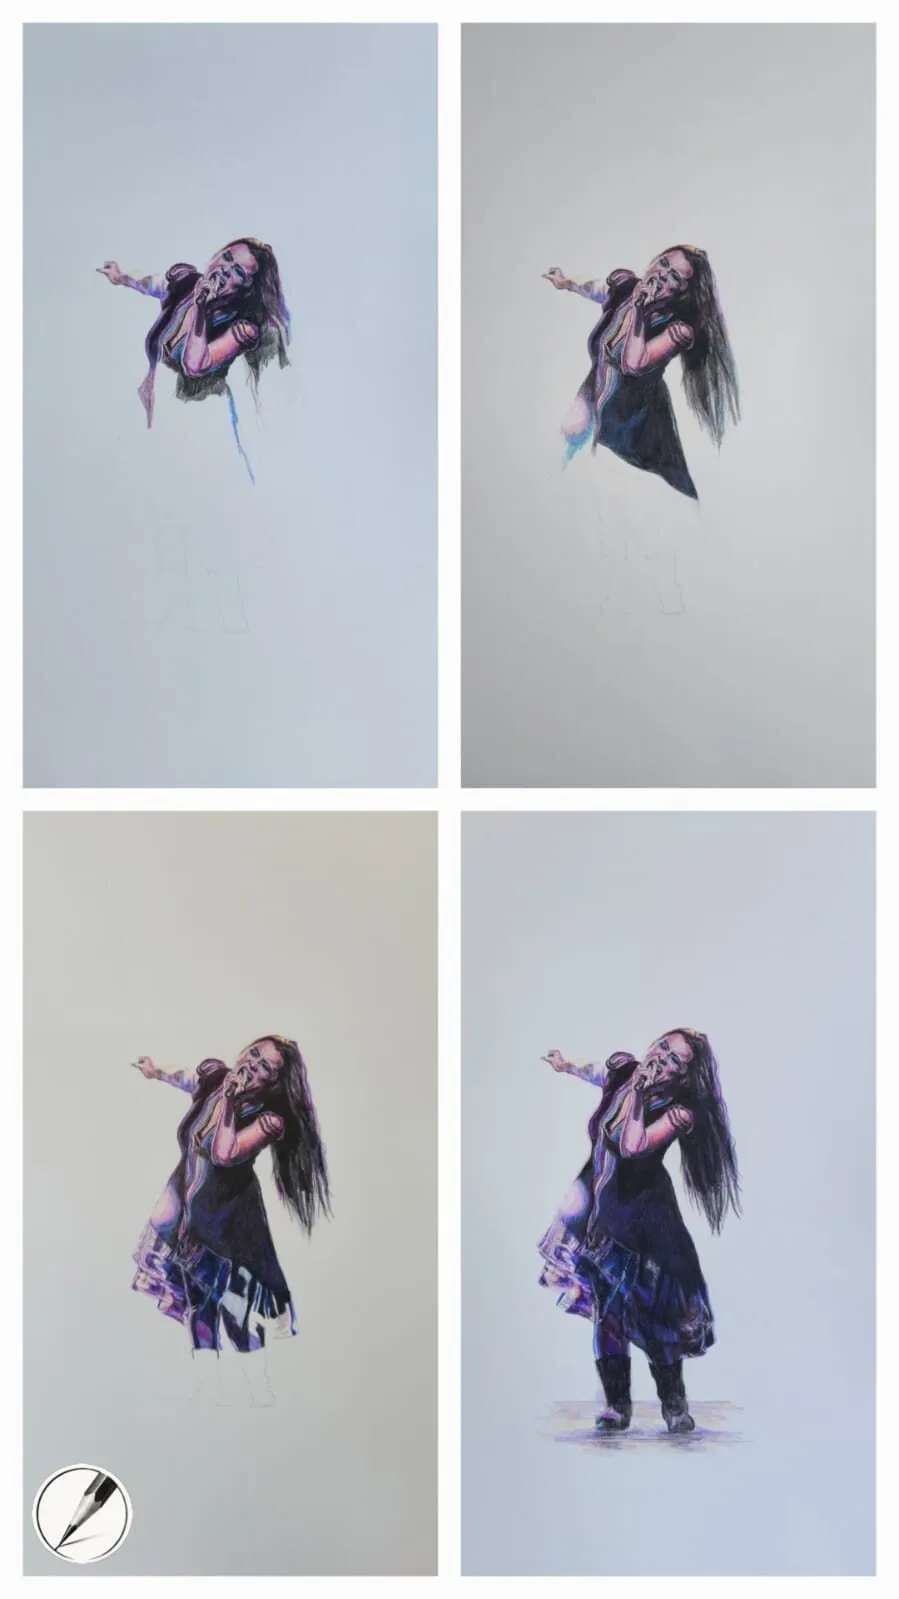
A kneeling footballer drawn in coloured pencil, shown in three stages. Drawing by Michael Brace.
2. Using the wrong paper
What happens: thin paper buckles or wears down, colour refuses to build and corrections tear the surface.
Fix: choose heavyweight paper, roughly 250 to 300 gsm for finished work, with tooth that suits your subject. Grey toned paper suits glossy, reflective subjects; smoother white paper suits portraits. See best paper for coloured pencils and paper weight explained.
3. Working with dull points
What happens: streaky tone, fuzzy edges and pigment pushed into the paper unevenly.
Fix: sharpen often and match the point to the job: a sharp point for detail and edges, the side of a slightly blunter point for broad, even layers. The how to sharpen coloured pencils guide covers methods and tools.
4. Muddy colour
What happens: colours lose clarity and look grey or brown where they should glow.
Why: too many colours in one area, overworked layers or unplanned mixing.
Fix: use fewer pencils per area, keep layers thin, and swatch combinations first. Michael teaches colour matching as seeing undertones, building colours by mixing rather than choosing one pencil. See how to match and mix colours with pencils.
5. Overusing black
What happens: shadows look dead, and the drawing flattens.
Fix: build darks from layered deep reds, greens, blues and browns, and keep black for small accents. Michael’s swatch card shows colour interactions on grey paper: black with deep red makes a deeper black. Always test combinations on your own paper.
6. Hard outlines around everything
What happens: objects look like cartoons, cut out from their surroundings.
Fix: avoid a continuous dark outline. Define edges with value and colour changes instead, and vary edges between crisp and soft. Keep your initial layout lines very faint so they vanish under colour.
7. Too many highlights
What happens: the surface looks busy or plasticky rather than wet or shiny.
Fix: use a few sharp, high-contrast highlights sitting on smooth, simple mid-tones. Build the base tones fully, from deep shadows to midtones, before any highlight goes on; highlights only look bright when everything around them is darker. See how to draw glossy surfaces.
8. Burnishing too early
What happens: the surface goes smooth and glossy, but it will not accept more colour.
Why: burnishing presses hard to flatten tooth and lock pigment in place.
Fix: burnish only when your layers are complete, and do it deliberately in areas that need sheen. Read how to burnish coloured pencils.
9. Ignoring value
What happens: colours are accurate but the drawing looks flat.
Fix: plan your lights and darks before colour, and squint at your reference to see the big shapes. A greyscale check on your drawing shows whether the value structure holds. The value study tool and value in drawing help.
10. Not swatching
What happens: a colour looks right on the pencil but wrong on the page, particularly on toned paper.
Fix: swatch your pencils on an offcut of your actual paper, and test combinations and layering before you use them. On grey paper, colours can look different, so testing is essential.
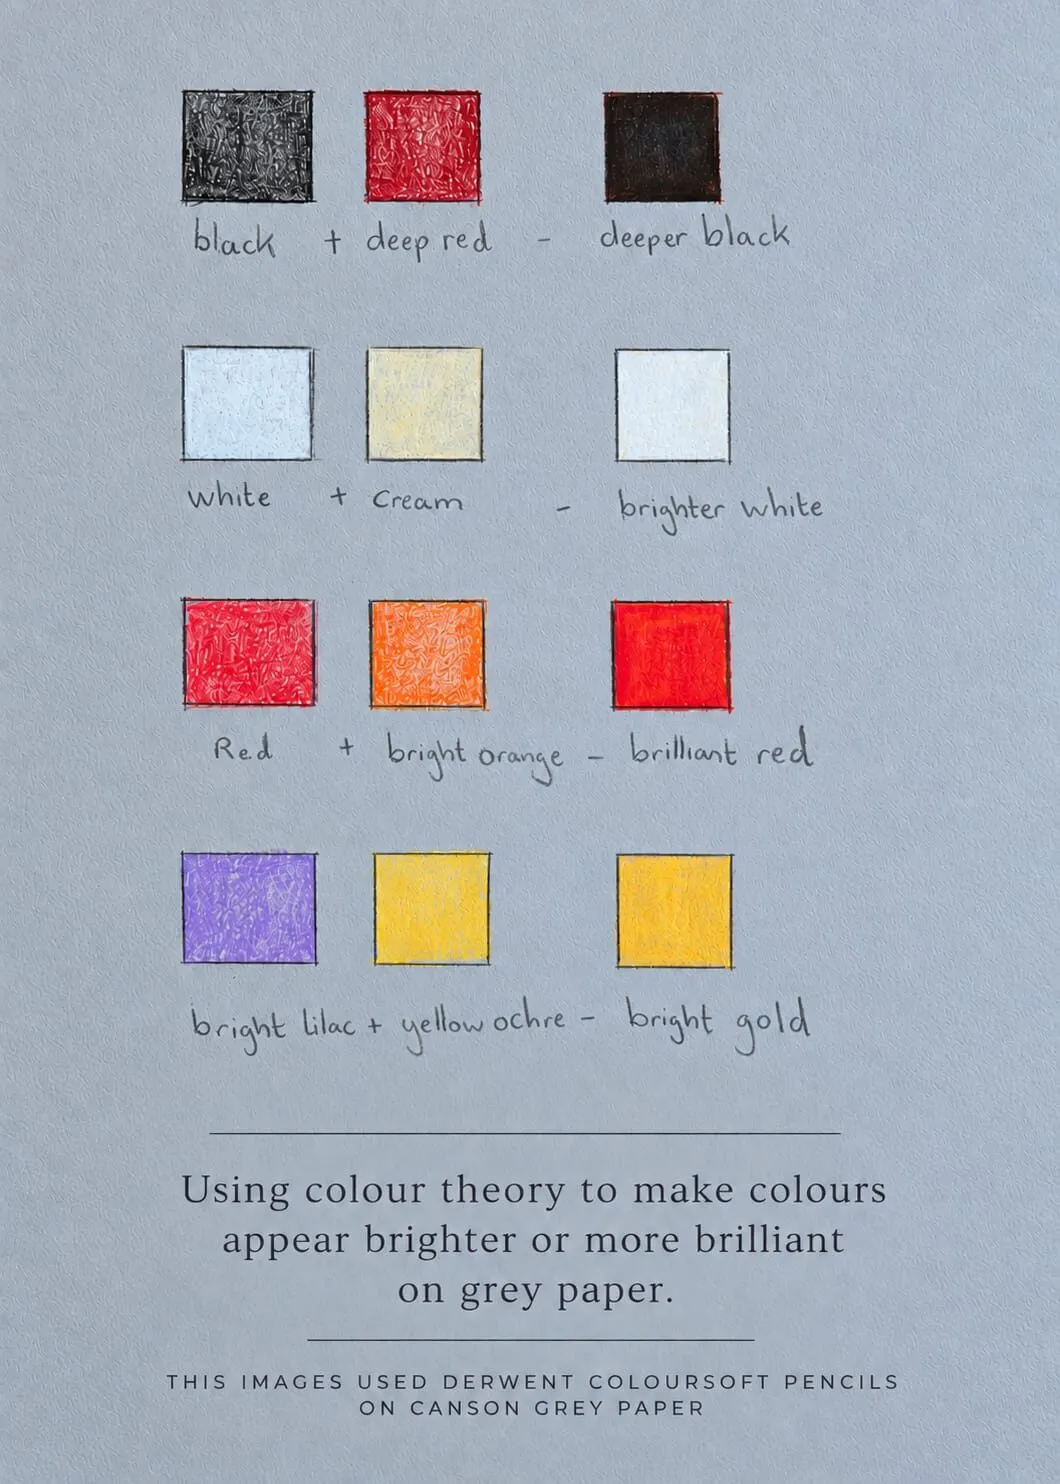
Michael’s swatch card: colour combinations tested on grey paper before they go into a drawing.
11. Skipping the plan
What happens: awkward composition, redrawn areas and rushed endings.
Fix: choose a reference, sketch thumbnails, plan values and colour, and set a layer sequence before you begin. The how to plan a coloured pencil drawing guide walks through it.
12. Finishing one area before the rest
What happens: one corner looks polished and the rest looks unfinished, so the drawing feels unbalanced.
Fix: bring the whole image up together. Work in stages: layout, base colours across everything, mid-tones, then detail last. Michael’s staged figures follow this order.
13. Skipping the light and dark pattern on toned paper
What happens: on grey paper, the drawing looks weak because the lights do not sit clearly against the ground.
Fix: remember that grey starts you in the middle. Build darks down and lights up, and save white or pale pencils for highlights. See why use grey paper for coloured pencil and colour theory on grey paper.
14. Erasing too aggressively
What happens: the paper surface is scuffed, shiny or torn, and new colour will not sit on it.
Fix: use gentle tools, such as eraser pencils, a putty rubber or a battery eraser with care, and plan highlights so you rarely need heavy erasing. Different papers lift differently: textured papers lift well, smooth papers lift gently. See lifting and erasing coloured pencil.
15. Expecting blending to be instant
What happens: artists press hard to blend and end up with waxy, flattened colour.
Fix: blending is built through layers, not pressure. Use lighter pencils, colourless blenders, solvents sparingly or simply more layers. The how to blend coloured pencils guide covers the options. Also be aware of surface build-up: our guide to wax bloom explains the hazy film that heavy wax layering can cause.
Quick-reference table
| Mistake | Quick fix |
|---|---|
| Pressing too hard | Start light, build thin layers |
| Wrong paper | Heavyweight paper with suitable tooth |
| Dull points | Sharpen often |
| Muddy colour | Fewer pencils, swatch first |
| Overusing black | Layer deep colours, use black for accents |
| Outlines | Define edges with value |
| Too many highlights | A few sharp highlights on simple midtones |
| Burnishing too early | Burnish only when layers are complete |
| Ignoring value | Plan a greyscale value map |
| No swatching | Test on an offcut of your paper |
A practical order of fixes
If you recognise several of these in your own work, do not try to fix everything at once. Work in this order: pressure and sharpening first, because they change every mark; then paper and swatching, because they set the ground rules; then value and planning, which shape the whole drawing; and finally highlights and burnishing, which belong at the end. One improvement at a time is easier to see and easier to keep.
How to diagnose a drawing that feels wrong
When a drawing looks off but you cannot say why, run through a short check before adding more pencil.
- Squint or view in greyscale. If the values are flat, the problem is value, not colour.
- Look at the surface in raking light. Shine or a waxy look means the tooth is filling, so stop layering and avoid extra pressure.
- Check your points. If edges look fuzzy and tone streaky, sharpen and rework lightly.
- Compare colours to your swatch. If a passage looks muddy, you may have mixed too many pencils in one place.
- Step back and leave it. Fresh eyes the next day show proportion and balance problems that you cannot see mid-session.
A small exercise to lock in the fixes
Take a scrap of your usual paper and draw a simple sphere three times. On the first, press hard from the start. On the second, build it with light, sharp-pointed layers. On the third, do the same but plan the values first. Compare all three side by side. The difference in smoothness, depth and control is usually obvious, and it gives you a personal reference for how your own pencils and paper behave.
The short version
Most of these mistakes come down to haste. Press lightly, sharpen often, choose paper that can take layers, plan values and colours and save highlights and burnishing for last. Fix one habit per drawing and check your progress against earlier work. For more on choosing tools, see best coloured pencils.
Quick answers
Frequently asked questions
What is the most common coloured pencil mistake?+
Pressing too hard too soon. Heavy pressure early flattens the paper's tooth, so later layers have nothing to grip and the surface turns waxy or shiny. The fix is to start with light pressure, build many thin layers with sharp points and keep heavy pressure for burnishing at the very end.
Why does my coloured pencil drawing look muddy?+
Muddy colour usually comes from mixing too many colours in the same area, overworking layers or layering complements without a plan. Use fewer pencils, keep layers thin, plan your colours in advance and swatch combinations on your paper first. Clean, sharp points and clear value contrast also help.
Should I use black pencil in coloured pencil drawings?+
Sparingly. Black can flatten and deaden colour if used everywhere. Many artists build rich darks by layering deep reds, greens, blues and browns instead, and keep black for accents. Michael's swatch card shows black over deep red gives a deeper black. Test on your own paper.
When should I burnish a coloured pencil drawing?+
Only when your layers are complete. Burnishing flattens the tooth and locks pigment in place, so you cannot add much colour afterwards. Burnish lightly and deliberately, usually with a light pencil, on areas that need a smooth, glossy finish.
Are colored pencils and coloured pencils the same?+
Yes. Coloured pencils is the UK spelling and colored pencils is the US spelling, and they are the same pencils. The mistakes and fixes here apply to either.